

Leitfaden
So bearbeitest du Fotos nur mit deinem iPhone
Lerne die Kunst der Nachbearbeitung und verwandle deine iOS-Bilder in Fotos wie vom Profi

Benedict Brain
Fotograf und Autor
27. Juli 2026∙10 min


Leitfaden
Lerne die Kunst der Nachbearbeitung und verwandle deine iOS-Bilder in Fotos wie vom Profi
Benedict Brain
Fotograf und Autor
27. Juli 2026∙10 min
Great photos are not always made at the moment you press the shutter. Often, they take shape afterwards, when you spend time refining what you've captured. This is the heart of post-processing. The good news is that if you have an iPhone, you already have the tools you need.
Post-processing means editing your photo after you've taken it – cropping, brightening, adjusting colours or sharpening the details. Editing isn't about transforming your photo into something artificial. It's about making subtle changes that bring it closer to your original experience, taking a photo from a quick snap to something more thoughtful, more deliberate and more finished.
To access your editing tools, open a photo in the Photos app on your iPhone and tap Edit in the top right corner. All edits are non-destructive, meaning you can always undo them or revert to the original.
These aren't a checklist to work through in order – pick whichever apply to the photo in front of you.
Even a strong photo can benefit from a crop. It helps remove distractions, focus attention and improve balance. Straightening is especially helpful with landscapes, architecture or anything where lines are important. You can also change the aspect ratio – making a photo square, panoramic or sized for social media. Avoid heavy cropping unless necessary, as this reduces image quality.
How to do it: In Edit mode, tap the crop icon. Drag the edges to reframe, or use the dial to straighten.
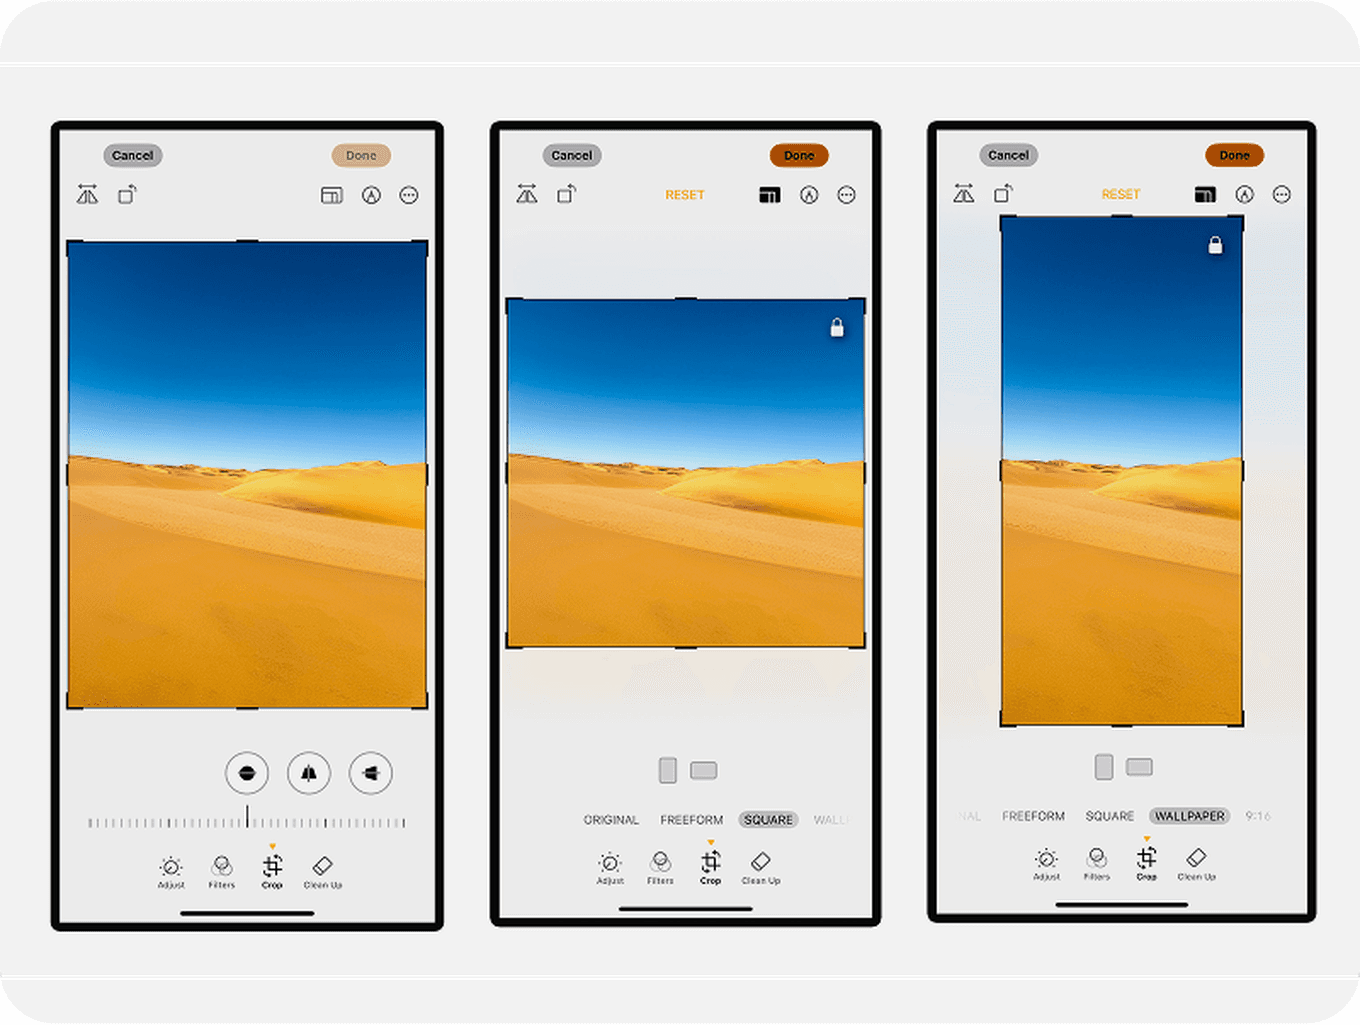
Das Zuschneiden hilft dabei, Ablenkungen zu entfernen, die Aufmerksamkeit zu fokussieren und die Balance deines Bildes zu verbessern
If you have a newer iPhone – iPhone 15 Pro, 15 Pro Max and above – you'll see a tool called Clean Up. It looks like a small plaster or bandage. Clean Up uses intelligent algorithms to remove the object and fill in the area naturally. It works best on plain textures like sky, grass or walls – think of it as a digital tidy-up, not a complete remodel.
How to do it: Tap the Clean Up tool and brush over anything in the frame you'd rather not see, such as a discarded coffee cup, a background light switch or a figure in the distance.
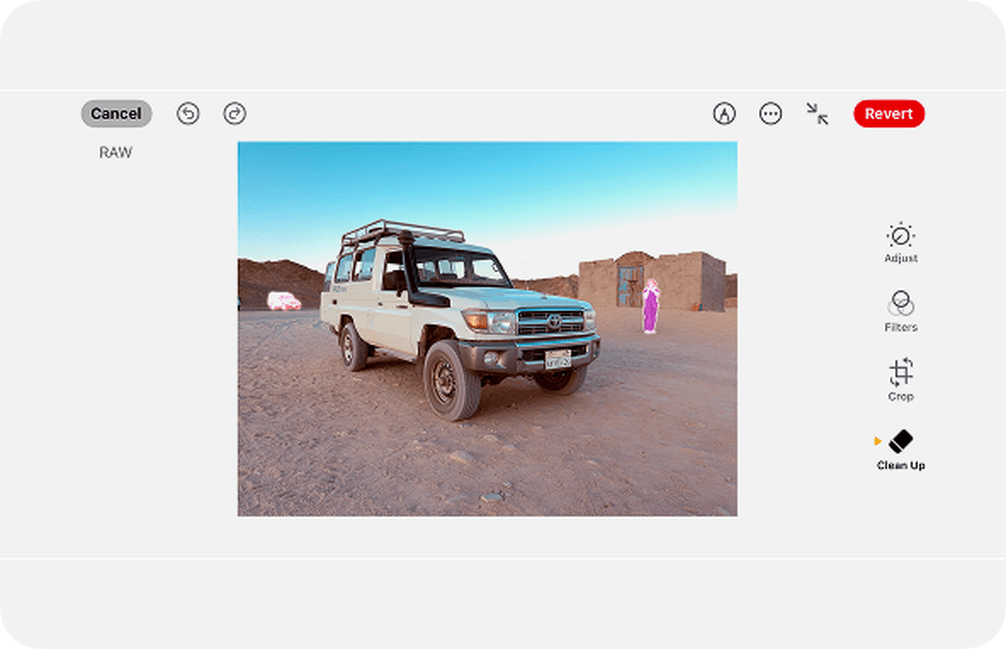
Streiche über alles im Bildausschnitt, was du lieber nicht sehen möchtest
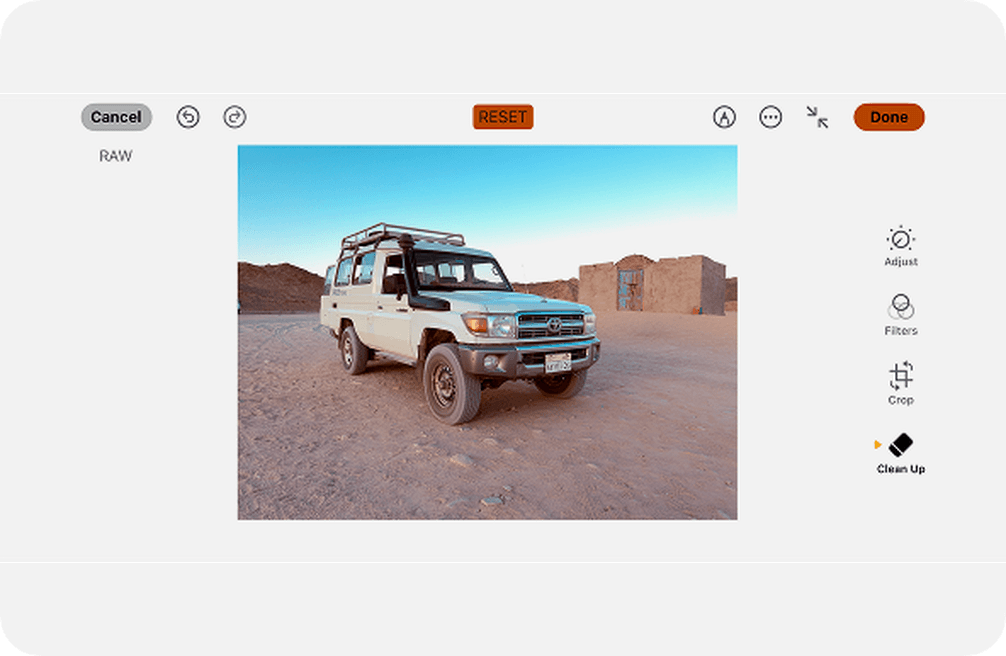
Nach der Verwendung von Apples Clean-Up-Option
Brightening can bring back subtle detail, especially in underexposed areas. Adding contrast helps separate tones and gives the image more presence. Make changes slowly – move sliders in small increments and stop when it feels natural.
How to do it: Tap the adjustment dial icon. Start with Brilliance or Exposure to brighten the whole image, then fine-tune with Highlights, Shadows and Contrast.
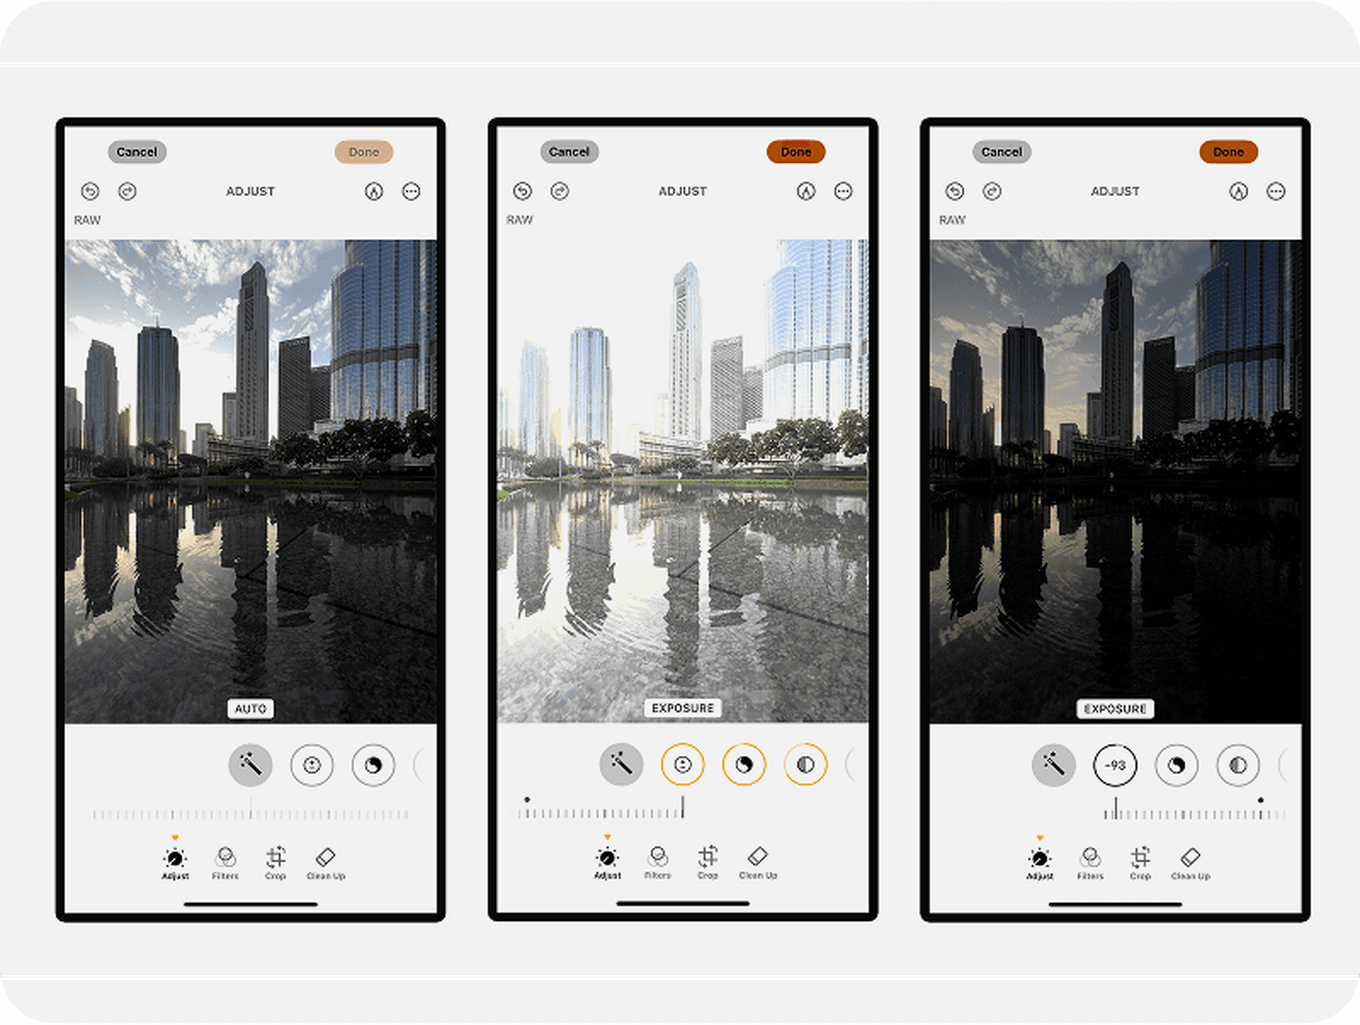
Dank der Aufhellung kannst du subtile Details wiederherstellen. Durch Kontraste lassen sich außerdem Töne besser voneinander trennen.
Colour is an emotional part of photography – it influences how we feel about an image. Pay close attention to skin tones, sky, and neutral objects like walls and clothes; when these look right, the rest often falls into place. Keep colour edits subtle: a small tweak can make a big difference, and too much saturation or the wrong colour balance can quickly make a photo look unnatural.
How to do it: Tap into the Colour section. Adjust Warmth to make the photo more golden or cooler, Tint to balance between magenta and green, and Saturation to add or reduce intensity. For a quick one-tap fix, use the Filters menu instead.
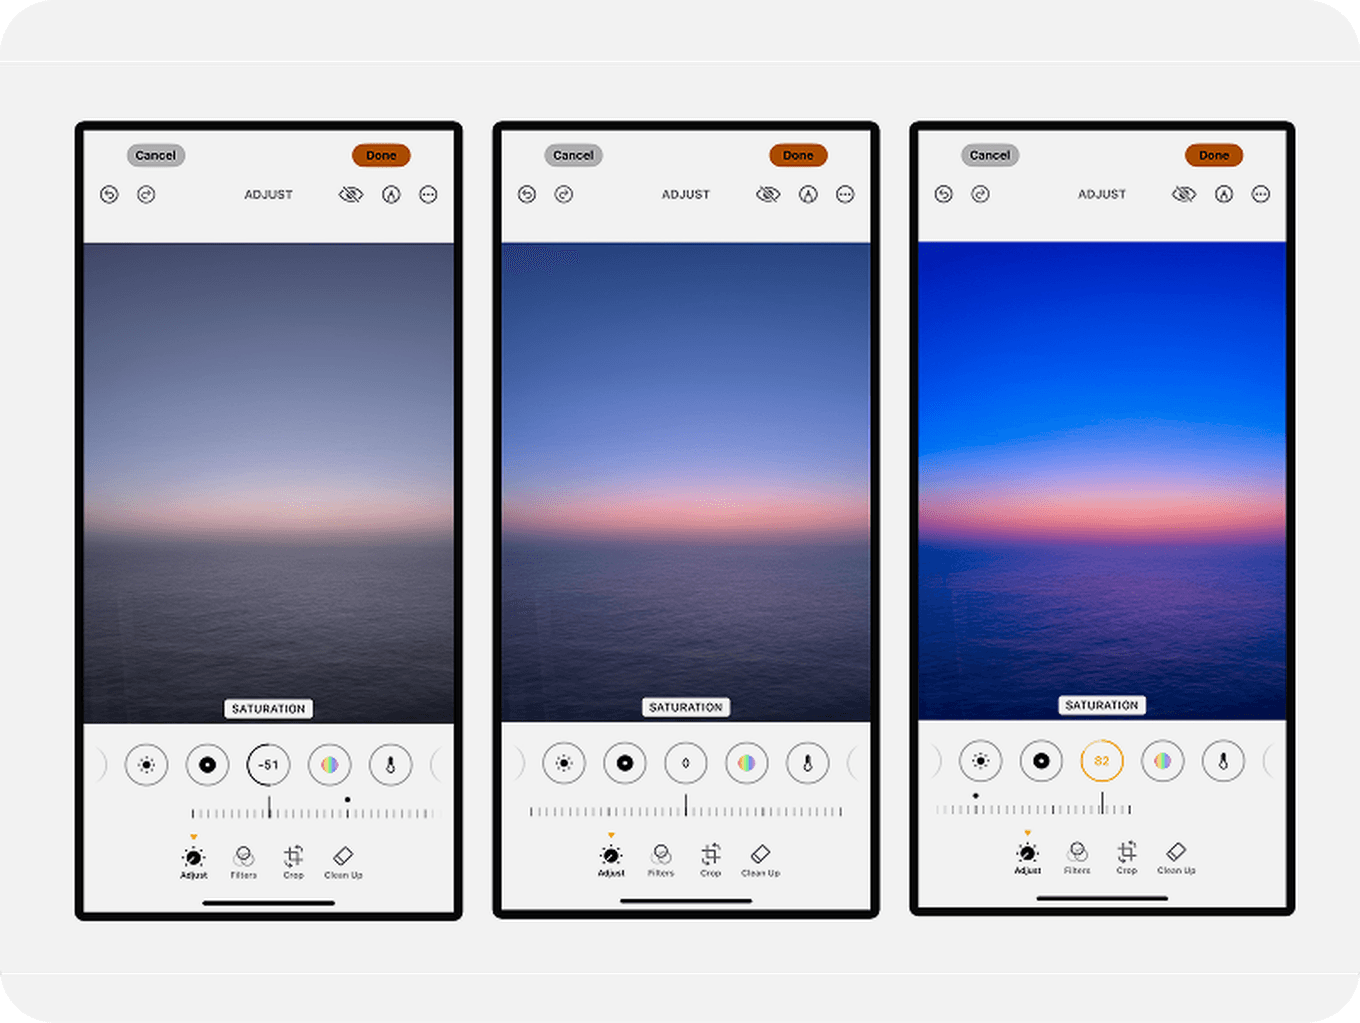
Sei vorsichtig mit Farbkorrekturen – schon kleine Änderungen können einen großen Unterschied machen
Sharpness and Definition enhance texture in fabric, hair, fur or foliage, giving the image a crisper feel. Use sparingly – too much sharpness introduces grain and unwanted digital noise.
How to do it: Find Sharpness and Definition in the adjustment tools. View the photo at full size and stop when it feels clean and detailed, but not harsh. You can also try Noise Reduction for low-light images, though this can soften details.

Schärfe und Definition verleihen dem Bild mehr Klarheit
Many photographers like to sit with an image before sharing or printing. Time brings perspective – you may see things differently the next day.
How to do it: Tap Done to save your edits. They're non-destructive, so you can return at any time, make further changes, or tap Revert to go back to the original.

Betrachte deine Bearbeitung mit neuen Augen
Apple's built-in tools are perfectly good for everyday editing, but there are times when you want more control or creativity. Snapseed, a free app from Google, offers selective adjustments, healing for precise object removal, text, overlays, frames, blur effects, double exposure and curves. VSCO is known for its cool, subtle filters. Adobe Lightroom Mobile is excellent for those who want more advanced control, especially when editing raw files.
How to do it: Download Snapseed, VSCO, or Adobe Lightroom Mobile from the App Store, depending on the effect you're after.
&w=3840&q=75)
Verwende Apps von Drittanbietern, um Rahmen hinzuzufügen
&w=3840&q=75)
Füge Text hinzu
&w=3840&q=75)
Füge Doppelbelichtung hinzu
&w=3840&q=75)
Oder füge Filmeffekte hinzu
Whether you're editing a portrait of your child, a flower from a walk in the park or a view from your travels, do it slowly, with care and mindfulness. Happy editing.
Dieser Leitfaden stammt von Benedict Brain – Fotograf, Autor, preisgekrönter Journalist und Dozent. Er ist Autor der Bücher „You Will Be Able to Take Great Photos by the End of This Book“ und „A Camera Bag Companion“, die weltweit erschienen und in mehrere Sprachen übersetzt wurden. Zudem schreibt er die langjährige Kolumne „The Art of Seeing“ und hält international Vorträge über kreative Bildgestaltung.
Dank Popsas praktischer Gesichtserkennung und unseren Intelligenten Alben kannst du Erinnerungen jetzt noch schneller wiederfinden.



&w=96&q=75)
&w=96&q=75)

&w=96&q=75)


 Vereinigte Staaten